


EA Sports UFC 3 might have caught your attention for its sheer attention to detail and its brutally realistic way of portraying fights. This is a game where every action has a particular cost and consequence. Your fighter’s stamina determines what kind of actions you can perform. While a heavy attack might deal more damage, it also leaves you open for the enemy to attack in case your initial attack doesn’t connect. Due to these complexities in the fighting system, it can be both frustrating as well as extremely rewarding to play this game. Whether you’re veteran of the series, or a new player, this guide has you covered. If you’re ready, then let’s get started!
GENERAL TIPS AND TRICKS
Learn how ground game works
To get good at this game, you need to learn how to safely transition into another position when you’re on the ground. It also means learning to deny transitions when your opponent is on the ground. When you’re on the ground, your grapple HUD will display what positions you can transition to. You just need to select the position you want and then wait for the transition meter to fill up so as to get into a new position.
On the other hand, you can also deny your opponent’s transition attempts by holding the R2 or Right Trigger Button and matching the same direction your opponent is attempting to transition into. Additionally, in certain positions you can also just attack the opponent to disrupt a transition.
Combat when standing up
When standing up, you can target different body parts of the opponents to strike. Each strike costs stamina and the lower your stamina, the less damage you deal and the more damage you’re dealt. Each different body part has its own health meter which drains as they take repeated hits. If a particular body part is damaged enough, it leaves the fighter open to knockout, knockdown, and stun.
Always pay attention to your opponent’s attack patterns and strike back accordingly. You have to be very careful about using your attacks and not wasting stamina since missing a strike will cause you to lose more stamina.
Strike cancelling
In case you already initiated a strike that you know is going to cost you dearly, you can quickly choose to cancel the strike by holding the high block. This can also be used to fake attacks so as to confuse the opponent. If you know that a particular attack is going to be blocked or counter, make sure you cancel the strike using this method as it can suddenly give you an upper hand.
Stopping power
If you land a strike at any point when your opponent is also about to strike you, this new feature known as stopping power kicks in. This basically reduces the damage you take from a particular attack and it may even end up stopping the opponent’s strike completely. It’s a great way to counter certain attacks thrown at you by the opponent, so make good use of it!
SINGLE PLAYER CHALLENGES
One of the best ways to get better at this game is to participate in the single-player challenges that are available. These are unique scenarios that test different aspects of your skills such as defense, offense, combos, etc. Challenges can range from having to land a particular kind of attack a number of times, or not getting hit too many times. Each challenge also has multiple difficulty modes including Normal, Hard, and Insane difficulty settings, so it’s a great way to train yourself in those parts of fighting that you want to get better at.
FULL COMBO LIST
You can find below the full list of combos. Default Combos refer to those combos that are common to all fighters. Certain combos however require a fighter to be trained in a particular discipline. The fighter’s proficiency in a particular discipline determines the level of combos the fighter has access to. Read on to find any combo you’re looking for within any discipline.
DEFAULT COMBOS
2 Punch
- 1-2 (Jab-cross)
- 1-6 (Jab-back uppercut)
- 1-3 (Jab-Lead Hook)
- 1-5 (Jab-Lead Upper)
- 1 – 2b (jab – cross body)
- 1 – 4b (jab – back hook body)
- 1 – 6b (jab – back upper body)
- 1b-2 (jab body – cross)
- 1b-4 (jab body- back hook)
- 1b-6 (jab body- back upper)
- 1b-2b (jab body-cross body)
- 1b-4b (jab body-back hook body)
- 1b-6b (jab body-back upper body)
- 1 (jab)- 8
- 1b-1 (jab body-jab head)
- 1-1b (jab -jab body)
- 2-3 (cross – lead hook)
- 2-5 (cross – lead upper)
- 2-7 (cross-lead overhand)
- 2-3b (cross-lead hook body)
- 2-5b (cross-lead upper body)
- 2b-3 (cross body-lead hook)
- 2b-5 (cross body-lead upper)
- 2b-1b (cross body-jab body)
- 2b-3b (cross body-lead hook body)
- 2b-5b (cross body-lead upper body)
- 3-6 (lead hook-back Upper)
- 3-4b (lead hook-back hook body)
- 3-6b (lead hook-back upper body)
- 3b-2 (lead hook body- cross)
- 3b-4 (lead hook body- back hook)
- 3b-6 (lead hook body- back upper)
- 3b-2b (lead hook body – cross body)
- 3b-4b (lead hook body – back hook body)
- 3 (lead hook)- back overhand
- 4-3 (back hook – lead hook)
- 4-5 (back hook – lead upper)
- 4-3b (back hook – lead hook body)
- 4-5b (back hook – lead upper body)
- 4b-3 (back hook body-lead hook)
- 4b-5 (back hook body-lead upper)
- 4b-3b (back hook body-lead hook body)
- 4b-5b (back hook body-lead upper body)
- 5-2 (lead upper-cross)
- 5-4 (lead upper-back hook)
- 5-6 (lead upper-back upper)
- 5-2b (lead upper-cross body)
- 5-4b (lead upper-back hook body)
- 5-6b (lead upper-back upper body)
- 5b-2 (lead upper body-cross)
- 5b-4 (lead upper body-back hook)
- 5b-6 (lead upper body-back upper)
- 5b-2b (lead upper body-cross body)
- 5b-4b (lead upper body-back hook body)
- 5b-6b (lead upper body-back upper body)
- 5 (lead upper)- back overhand
- 6-3 (back upper-lead hook)
- 6-5 (back upper-lead upper)
- 6-3b (back upper-lead hook body)
- 6-5b (back upper-lead upper body)
- 6b-3 (back upper body-lead hook)
- 6b-5 (back upper body-lead upper)
- 6b-3b (back upper body-lead hook body)
- 6b-5b (back upper body-lead upper body)
- 8-3 (back overhand-lead hook)
- 8-5 (back overhand-lead upper)
- lead leg kick – overhand
3 Punch
- 1-1-2 (Jab-Jab-Cross)
- 1-1-2b (jab-jab-cross body)
- 1-1-4 (Jab-Jab-back hook)
- 1-1-6 (Jab-Jab-back upper)
- 1-2-1 (jab-cross-jab)
- 1-2-3 (jab-cross-lead hook)
- 1-2-5 (jab-cross-lead upper)
- 1-4-3 (Jab-Rear Hook-Lead Hook)
- 2-1-2 (cross-jab-cross)
- 2-1-4 (cross-jab-back hook)
- 2-1-6 (cross-jab-back upper)
- 3-2-3 (lead hook-cross-lead hook)
- 3-4-3 (lead hook-back hook-lead hook)
Kick
- Jab-back leg kick
- Jab-back body kick
- Jab-back head kick
BOXING
Boxing Level 1
- 1b-3 (jab body-lead hook)
- 1-3b (jab -lead hook body)
- 1b-8 (Jab body-back Overhand)
- 7-2 (lead overhand-cross)
- 7-4 (lead overhand-back hook)
- 1b-1-2 (jab body-jab -cross)
- 1-4-1 (jab-back hook-jab)
- 1-4-5 (Jab-back Hook-lead upper)
- 1-6-1 (jab-back upper-jab)
- 1-6-5 (jab-back upper-lead upper)
- 2-3-2 (cross-lead hook-cross)
- 2-3-4 (cross-lead hook-back hook)
- 2-3-6 (cross-lead hook-back upper)
- 2-5-2 (cross-lead upper-cross)
- 2-5-6 (cross-lead upper-back upper)
- 3-4-5 (Lead Hook-Rear Hook-Lead Upper)
- 4-3-4 (back hook-lead hook-back hook)
- 5-4-3(lead upper-back hook-lead hook)
- 1-2-1-2 (jab-cross-jab-cross)
- 1-1-2-3 (Jab-Jab-Cross-Lead Hook)
Boxing Level 2
- 3b-3 (lead hook body- lead hook)
- 3-3b (lead hook – lead hook body)
- 1-2-3b (jab-cross-lead hook body)
- 1-3-2(jab-lead hook-cross)
- 1-3-4(jab-lead hook-back hook)
- 1-6-3 (jab-back upper-lead hook)
- 1b-2-3 (jab body – cross-lead hook)
- 1-4b-3b (jab-back hook body-lead hook body)
- 2-3b-4b (cross-lead hook body-back hook body)
- 2-5-4 (Cross-Lead Upper-Rear Hook)
- 3b-4b-3 (lead hook body-back hook body-lead hook)
- 3-6-5 (lead hook-back Upper-lead upper)
- 5-2-3 (lead upper-cross-lead hook)
- 5-2-5 (lead upper-cross-lead upper)
- 5-4-5(lead upper-back hook-lead upper)
- 5-6-3 (lead upper-back upper-lead hook)
- 1-1-2-5 (Jab-Jab-Cross-Lead Upper)
- 1-2-3-2 (Jab-Cross-Hook-Cross)
- 1-2-3-4*(jab-cross-lead hook-back hook)
- 2-3-4-3 (Cross-Lead Hook-Rear Hook-Lead Hook)
Boxing Level 3
- 3b-8 (lead hook body- back overhand)
- 1-3-6(jab-lead hook-back upper)
- 1b-6-3 (jab body- back upper-lead hook)
- 2-3-2b (cross-lead hook-cross body)
- 2-5-4b (cross-lead upper-back hook body)
- 2b-3-4 (cross body-lead hook-back hook)
- 3-2-5 (Lead Hook-Cross-Lead Upper)
- 3b-3-2(lead hook body- lead hook- cross)
- 3b-3-6 (lead hook body- lead hook-back upper)
- 3-4b-3b (lead hook-back hook body-lead hook body)
- 3b-4-3 (lead hook body- back hook-lead hook)
- 3b-4b-3b (lead hook body-back hook body-lead hook body)
- 3-6-3 (Lead Hook-Rear Upper-Lead Hook)
- 5b-4-3(lead upper body-back hook-lead hook)
- 5-4b-3b (lead upper-back hook body-lead hook body)
- 1-2-3-6 (Jab-Cross-Lead Hook-Rear Upper)
- 1-2-5-2 (jab-cross-lead upper-cross)
- 1-2-5-6 (jab-cross-lead upper-back upper)
- 1-3-4-3(jab-lead hook-back hook-lead hook)
- 2-3-2-5 (cross-lead hook-cross-lead upper)
Boxing Level 4
- 1-2b-3 (jab-cross body-lead hook)
- 1-4b-3 (Head Jab-Body Rear Hook-Head Lead Hook)
- 2b-3-2 (cross body-lead hook-cross)
- 2-3b-4 (cross-lead hook body-back hook)
- 3-4b-3 (lead hook-back hook body-lead hook)
- 3b-2-5(lead hook body- cross- lead upper)
- 1-1-2b-3 (jab-jab-cross body-lead hook)
- 1-4-3-2 (jab-back hook-lead hook-cross)
- 1-4-3-6 (jab-back hook-lead hook-back upper)
- 1-6-3-4 (jab-back upper-lead hook-back hook)
- 2-5-2-3 (cross-lead upper-cross-lead hook)
- 2-5-4-5 (cross-lead upper-back hook-lead upper)
- 3b-4-3-4 (Body Lead Hook-Body Rear Hook-Head Lead Hook-Head Right Hook)
- 3-6-3-2 (Lead Hook-Rear Upper-Lead Hook-Cross)
- 3-6-3-6 (Lead Hook-Rear Upper-Lead Hook-Rear Upper)
- 3-4-5-2 (lead Hook-back hook-lead upper-cross)
- 3-4-3-4 (lead hook-back hook-lead hook-back hook)
- 5-2-3-4 (lead upper-cross-lead hook-back hook)
- 5-4-3-4 (lead upper-back hook-lead hook-back hook)
- 5-6-3-4 (lead upper-back upper-lead hook-back hook)
Boxing Level 5
- 2-3b-6 (cross-lead hook body-back upper)
- 2-3b-3 (cross-lead hook body-lead hook)
- 3-4b-5 (lead hook-back hook body-lead upper)
- 3-6b-3 (lead hook-back upper body-lead hook)
- 5-4b-3 (lead upper-back hook body-lead hook)
- 1-3-2-5 (jab-lead hook-cross-lead upper)
- 1-4-5-4 (Jab-Rear Hook-Lead Upper-Rear Hook)
- 1-4-5-2 (jab-back hook-lead upper-cross)
- 1-6-3-6 (jab-back upper-lead hook-back upper)
- 2-3-6-3 (cross-back hook-back upper-lead hook)
- 3-2-5-4 (Lead Hook-Cross-Lead Upper-back Hook)
- 3-2-5-2 (lead hook-cross-lead upper-cross)
- 3-6-5-4 (lead hook-back Upper-lead upper-back hook)
- 3-4b-3b-4 (lead hook-back hook body-lead hook body-back hook)
- 3b-4-3-4b (lead hook body- back hook-lead hook-back hook body)
- 3b-4b-3b-4b (lead hook body-back hook body-lead hook body-back hook body)
- 5-2-3-6 (lead upper-cross-lead hook-back upper)
- 5-4-5-2(lead upper-back hook-lead upper-cross)
- 5-6-3-6 (lead upper-back upper-lead hook-back upper)
- 5-4b-3b-4b (lead upper-back hook body-lead hook body-back hook body)
Muay Thai
Muay Thai Level 1
- lead leg kick-2
- lead elbow – back elbow
- back*elbow – lead elbow
- 1-lead leg kick
- 1-lead body kick
- 1-back teap body
- 2-back leg kick
- 2-back body kick
- 2 – lead leg kick
- 2 – lead body kick
- 3 – back leg kick
- 3b – back leg kick
- 3 – back body kick
- 5 – back leg kick
- 5b – back leg kick
- 1-1-back leg kick
- 1-1-back body kick
- 1-2- lead leg kick
- 1-2- back leg kick
- 2-1- back leg kick
- lead elbow – 4
- back elbow – 3
- lead elbow – 6
- back elbow – 5
Muay Thai Level 2
- 1-back superman
- 1-back jumping roundhouse
- 1-cartwheel kick
- 1-2- lead body kick
- 1-2- back body kick
- 1-3-back leg kick
- 1-4- lead leg kick
- 1-5-back leg kick
- 1-6-lead leg kick
- 2-1- back body kick
- 2-3-back leg kick
- 2-3-back body kick
- 2-3b-back leg kick
- 2-5-back leg kick
- 2-5-back body kick
- 3-2-lead leg kick
- 4-3-back leg kick
- 5-2-lead leg kick
- lead elbow – back knee
- back elbow – back knee
- back elbow – lead knee
- 1-1-2-lead leg kick
- 1-1-2-back leg kick
- 1-2-3-back leg kick
Muay Thai Level 3
- lead superman-back leg kick
- lead superman-2
- back superman-lead leg kick
- back superman-3
- lead elbow – back spin elbow
- back knee – lead elbow
- back knee – back elbow
- lead knee – back elbow
- back spin elbow (miss) – 3
- back spin elbow – lead elbow
- 6to12 elbow – back spin elbow
- 6to12 elbow – 6
- 1-3-back body kick
- 1-3b-back leg kick
- 1-4- lead body kick
- 1-6-lead body kick
- 2-3b-back body kick
- 3-2-lead body kick
- 3-3b-back leg kick
- 5-2-back leg kick
- 1-1-2-lead body kick
- 1-1-2-back body kick
- 1-2-3-back body kick
Muay Thai Level 4
- lead leg kick-2-3
- back superman-3-back leg kick
- 8 (back overhand)-3b-back leg kick
- 1-3b-back body kick
- 1-5 – back body kick
- 2b-3-back leg kick
- 2b-3-back body kick
- 3-3b-back body kick
- 4-3-back body kick
- 4-3b-back leg kick
- 5-2-lead leg kick
- 5-3-back leg kick
- lead teap body-back leg kick
- lead teap body – lead switch body
- lead leg kick-back body kick
- lead leg kick – lead teap
- lead leg kick – back leg kick
- 1-2-lead leg kick-2
- 2-3-2-lead leg kick
- 2-3-4-lead leg kick
- 3-2-3-back leg kick
- lead body kick – back body kick
Muay Thai Level 5
- 1-2-3b-back leg kick
- 1-4-3b-back leg kick
- 1-6-3b-back leg kick
- 2-3-2-lead body kick
- 2-3-4-lead body kick
- 2-3-6-lead leg kick
- 3-2-3-back body kick
- 3-2-3b-back leg kick
- 3-2-5-back leg kick
- 3-2-5-back body kick
- 3-6-3-back leg kick
- 3-6-3-back body kick
- 3-6-3b-back leg kick
- 5-2-3-back leg kick
- 5-2-3-back body kick
- 5-2-3b-back leg kick
- 5-4-3-back leg kick
- 5-4-3-back body kick
- 2-lead body kick – back body kick
Kickboxing
Kickboxing Level 1
- 1-lead head kick
- 1-lead side kick body
- 1b-back head kick
- 1-back spin bfist
- 2-lead spin bfist
- 2 -lead head kick
- 2 – back head kick
- 2b -lead head kick
- 2b – back head kick
- 2-back side kick body
- 3-back spin bfist
- 3-back head kick
- 3b-back head kick
- 4-lead spin bfist
- 5-back head kick
- 5b-back head kick
- 1-1-back head kick
- 1b-1-back head kick
- 1b-2-lead head kick
- 1-2 – lead head kick
- 1-2-back head kick
- 2-1-back head kick
- 2-3- back head kick
Kickboxing Level 2
- 1-lead sidekick head
- 1-back jump spin kick body
- 1-back spin heel kick
- 2-back ducking roundhouse
- 2-back side kick head
- 3- back jump spin kick body
- lead head kick -2
- 1-3- back head kick
- 1-2b-lead head kick
- 1b-2-back head kick
- 1-4- lead head kick
- 1-5-back head kick
- 1-6 – lead head kick
- 2b-1-back head kick
- 2-5- back head kick
- 3-2- lead head kick
- 3-2- back head kick
- 3b-2-lead head kick
- 5-2- lead head kick
- 5-2- back head kick
- back spin bfist – 7
- lead spin bfist – 8
- 1-1-2-lead head kick
Kickboxing Level 3
- 2-lead spin heel kick head
- 3-back spin heel kick head
- 4-lead spin heel kick head
- 8-lead head kick
- 8-lead spin bfist
- 1b-2b-lead head kick
- 1-3b-back head kick
- 1-5b-back head kick
- 1-2-back ducking roundhouse
- 1-8-lead head kick
- 2-3b-back head kick
- 2-5b-back head kick
- 3b-2-back head kick
- 3-4-lead head kick
- 4-3-back head kick
- 4-3b-back head kick
- 5-2b-lead head kick
- 5b-2-lead head kick
- 5b-2-back head kick
- back head Kick- lead spin bfist
- lead head Kick- back spin bfist
- 1-1-2-back head kick
- 1-2-1-back head kick
Kickboxing Level 4
- 1b-8-lead head kick
- 3b-8-lead head kick
- 3-3b-back head kick
- 8-3b-back head kick
- 1-2-lead spin heel kick head
- 2-3-back spin heel kick head
- 1-4-lead spin heel kick head
- 2-1-back jump spin kick body
- 2-1-back spin heel kick
- lead head kick – back head kick
- lead head kick – back body kick
- lead body kick – back head kick
- lead sidekick body – back jump spin kick body
- lead sidekick body – back spin heel kick
- lead sidekick head – back spin heel kick
- lead sidekick leg – back jump spin kick body
- lead sidekick leg – back spin heel kick
- lead sidekick body – back spinning backfist
- lead head kick – back spin heel
- back head kick – lead spin heel
- back body Kick- lead spin bfist
- lead body Kick- back spin bfist
- lead hook kick-back spin bfist
- 1-2-3-lead head kick
- 1-2-3-back head kick
Kickboxing Level 5
- 2-lead head kick – back head kick
- 2-lead head kick – back body kick
- 2-lead body kick – back head kick
- 1-2-lead head kick-2
- 1-2-3b-back head kick
- 1-4-3-back head kick
- 1-4-3b-back head kick
- 1-6-3b-back head kick
- 1-6-3-back head kick
- 2-1-2-lead head kick
- 2-1-2b-lead head kick
- 2-1-2-back head kick
- 2-3-2-lead head kick
- 2-3-2b-lead head kick
- 2-3-2-back head kick
- 2-3-6-lead head kick
- 3-2-3-back head kick
- 3-2-3b-back head kick
- 3-2-5-back head kick
- 3-2-5b-back head kick
- 5-2-3-back head kick
Traditional
Traditional Level 1
- 1-back turn side kick body
- 1-lead axe kick
- 1-lead hook kick
- 1-back Q Mark kick
- 1-lead jump switch
- 1-back handplant head
- 1-back turn side kick head
- 1-back handplant body
- 1-lead tornado kick
- 1-cartwheel kick
- 2-back hook kick
- 2-back axe kick
- 2-lead Q mark kick
- 2-back Q Mark kick
- 1-2-back Q Mark kick
- 1-2-back hook kick
- lead Q Mark Kick – 2
- lead front kick head – 2
Traditional Level 2
- 3-back turning side kick body
- 3-lead axe kick
- 3-lead hook kick
- 3-cartwheel kick
- 3-back turn side kick head
- 3-back handplant body
- 3-back handplant head
- 3-lead tornado kick
- 4-lead spin side kick head
- 4-lead turning side kick body
- 5-lead hook kick
- 1-2-back axe kick
- 2-1-back Q mark kick
- back front kick-lead spinning backfist
- lead front kick body-back Q Mark kick
- lead side kick body – back turning sidekick head
Traditional Level 3
- 1-3-back turn side kick body
- 1-3-back turn side kick head
- 1-4-lead turn side kick body
- 1-4-lead turn side kick head
- 2-3-back Q mark kick
- 2-3-back spin side kick body
- 2-3-lead axe kick
- 2-3-lead hook kick
- 2-5-lead hook kick
- lead side kick body – back turning sidekick body
- lead hook kick – lead side kick body
- back hook kick – back side kick body
- lead jump switch – back turning sidekick body
Traditional Level 4
- 2-3-back turn side kick head
- 2-3-back handplant body
- 2-3-back handplant head
- 2-3-lead tornado kick
- back head kick – lead turning sidekick body
- back body kick – lead turning sidekick body
- back leg kick – lead turning sidekick body
- back head kick – lead turning sidekick head
- back body kick – lead turning sidekick head
- back leg kick – lead turning sidekick head
- back turning sidekick body – lead head kick
- lead front kick body-back turning sidekick body
- lead head kick – back turning side kick head
- lead head kick – back turning side kick body
- lead body kick – back turning side kick head
- lead body kick – back turning side kick body
- lead hook kick – back spinning backfist
Traditional Level 5
- back body kick – lead tornado kick
- lead front kick body-back turning sidekick head
- lead head kick – back handplant head
- back front kick body – back crane kick head
- lead front kick head – lead jump switch head
- tornado – back spinning heel kick
- back spinning heel – back handplant head
- lead hook kick – back spinning heel kick
- lead jump switch – back turning sidekick head
HOW TO GRAPPLE
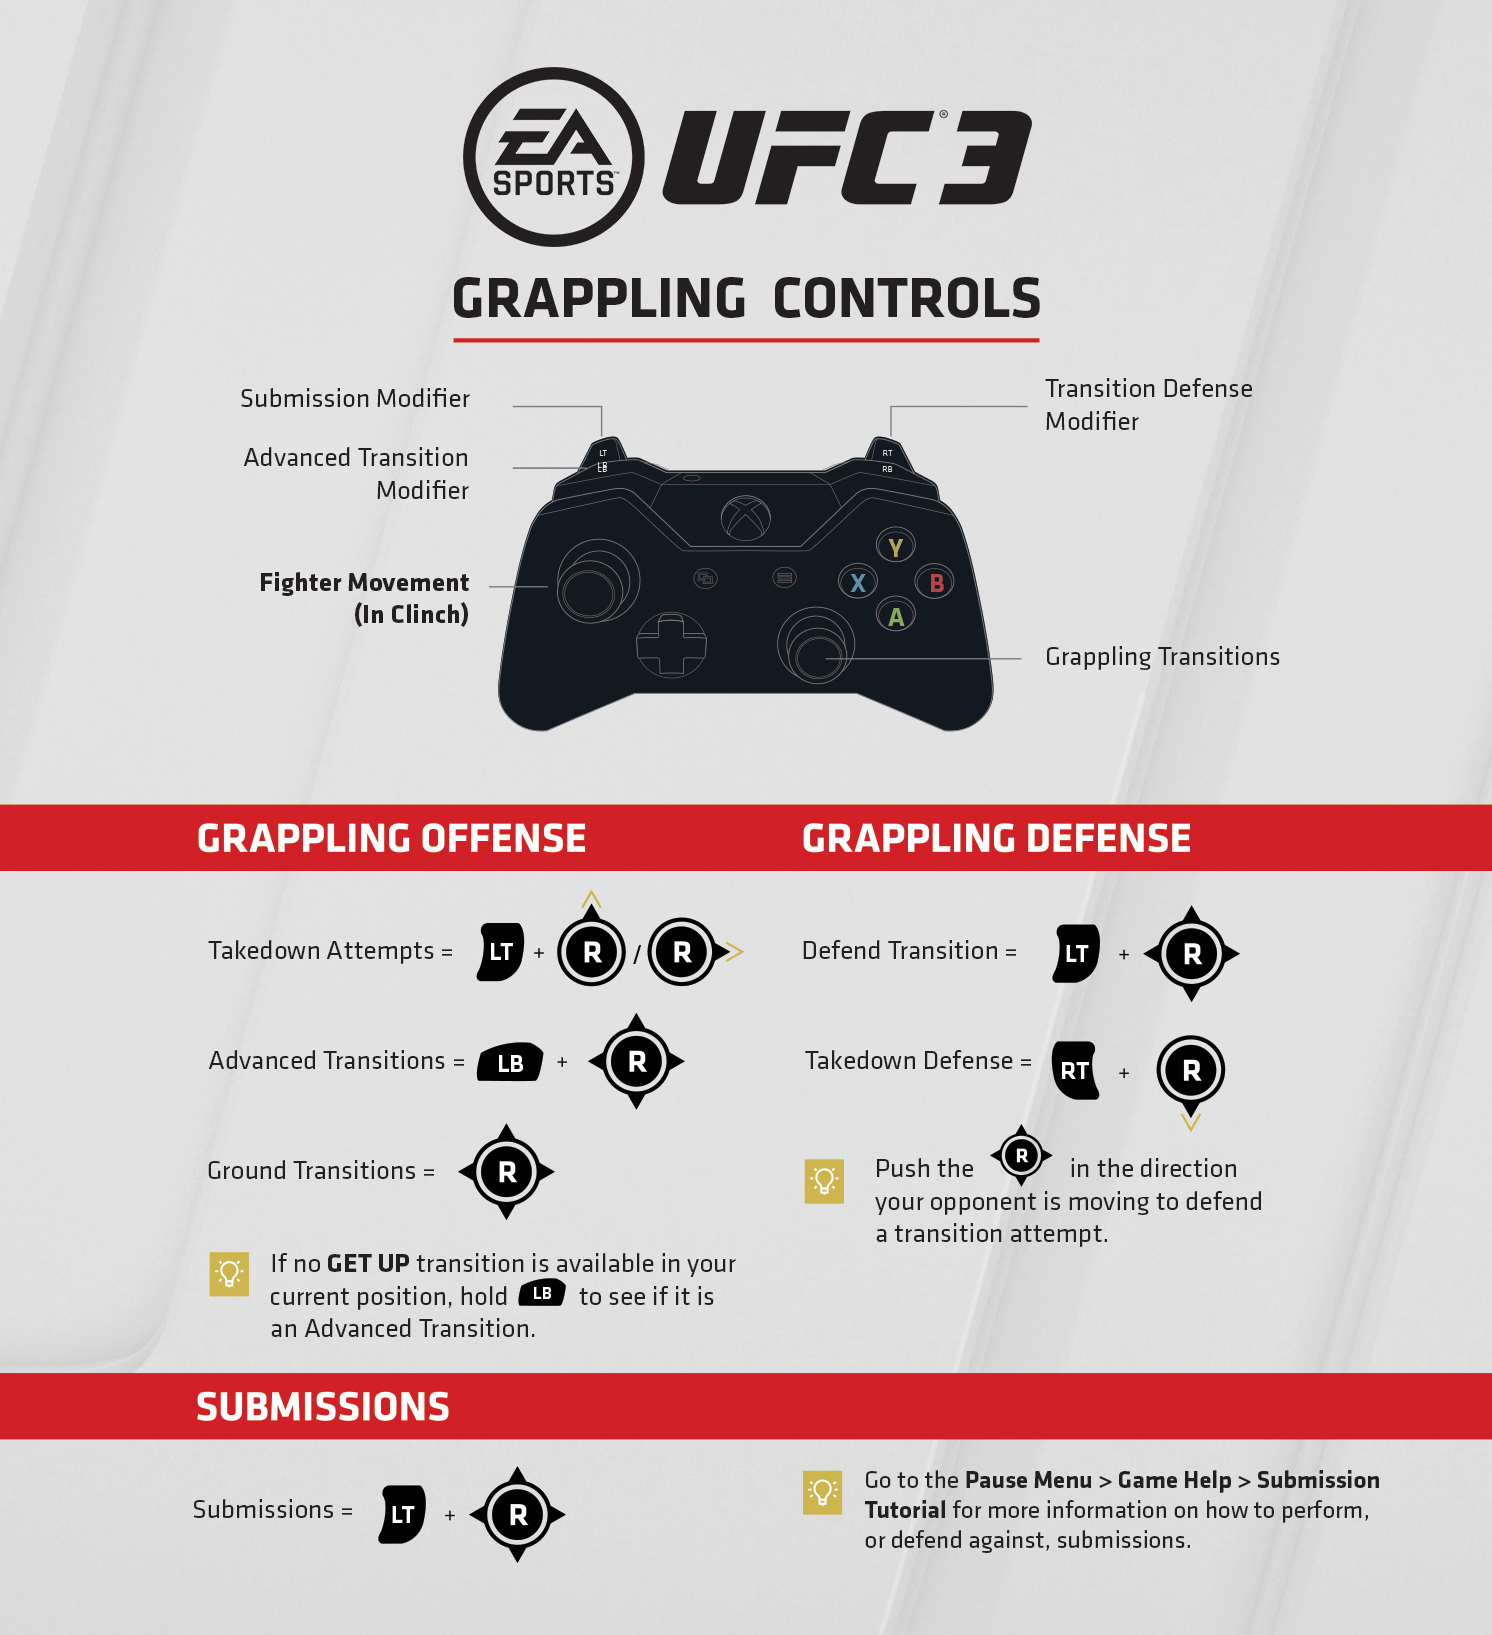
If you want to get into the ground game, you need to use Left Trigger + Right Stick left/right.The ground game allows you to get into a position which will allow you to perform a submission. Once you’ve got into a suitable position, just hold down Left Trigger to see what options are available to you when trying to perform the submission. You can now see in the HUD in what direction you need to move the right stick. Remember to keep holding the Left trigger and once you’ve also moved the right stick in the appropriate direction, your fighter will attempt to perform a submission.
You also have to try and block attacks when you’re on the ground. You have to time your escapes and you can then follow up with a successful block. You also need to be clever about the ground game and sometimes it would be more beneficial to try and get back up or to shift into a more favorable position. Additionally, you can also try to perform a sweep so as to gain the more dominant position in a fight.
HOW TO ESCAPE GRAPPLE
It can be a really dangerous position to find yourself on the ground and your opponent is throwing some deadly hits your way. Just stay calm and try to block the opponent’s attacks. If you are able to successfully block the opponent’s attack, this gives you room to try and gain the advantage. You can try and shift into a half guard position by using the left analog stick and moving it either left or right. Additionally, you can try and use an arm trap by holding R2 and then quickly moving the right analog stick to the left or right. Be careful when trying this because it leaves you open to some devastating attacks if you’re not able to perform the move properly.
If your opponent has you in a clinch against the cage, you can try to deny the clinch by holding the right trigger and using the right analog stick. It is possible that your attempt at denying the clinch may fail. If it comes to this, then your best bet is try and use a ‘take down’ against the opponent using your grappling HUD.
LEG KICKS GUIDE
Leg kicks can be really useful as they cause a lot of damage but they also carry high risk. Leg-kick damage does not recover which makes them very useful later on in fights. However, Leg kicks can also be countered so you have to be careful when using them. To counter a leg kick, simply use a low block by holding the left and right trigger buttons. Since leg kicks can be countered, make sure your opponent does not see one coming. Use them in the middle of combos and be unpredictable to get the best out of these attacks.
Check out the video below to learn more about leg kicks.
SUBMISSION GUIDE
Learning how to perform submissions successfully and countering your opponent’s submissions is crucial. If your opponent has you locked in a submission, you just have to use your right analog stick to push any one of the break walls to the edge of the submission HUD. Your opponent will try to stop you by matching your direction, so move to a different break wall if the current one isn’t moving. Just stay calm and keep pushing the break walls and you’ll soon be able to escape. Check out the video to learn more about submissions.
STRIKING GUIDE
You’ll have to learn these basic attacks and master them to get good at this game. To punch, you can use X or Y buttons on the Xbox One and the Square or Triangle Buttons on PS4. You can perform an upper cut by holding two buttons at once: the A and X or B and Y buttons on Xbox One, and the Square and X or Triangle and O on PS4. You can kick using the X or O buttons on PS4 and the A or B buttons on Xbox One.
Additionally, you can modify where your attacks land by using the Left Trigger. This can be used to target a particular body region of the opponent. Check out the video below to learn more about striking.
HOW TO BLOCK
If your opponent is unleashing some deadly combos against you or if you find yourself stuck and unable to plan ahead, then always remember that you can rely on using blocks to keep yourself from getting hurt. However, this is not something you can just use indefinitely and there are certain limitations you have to keep in mind. Pay attention to the block meter which indicates how many more hits it’ll take to break down your block. To effectively use blocks then, you’ll have to use them carefully along with using some clever footwork, switching stances, and getting some hits in against your opponent. Relying too much on the block will just end up exhausting you and then leave you open to attacks. Use the block wisely and it just might give you the time you need to turn a fight around.
STAND- UP GUIDE
When you’re standing up and fighting, you need to try and unleash your fighter’s devastating combos on the opponent. To do this, you’ll first have to learn your fighter’s combos and figure out what situations each one is best suited for. You’ll also have to block your opponent’s attacks as you attempt to get your own attacks in. Sometimes, you can’t just rely on blocking and so you’ll also have to use good footwork so as to gain an advantage over the opponent.
You also have signature moves or special moves you can use by pressing the R1 modifier. Make sure you learn how your fighter’s special moves work and use it in the right situation!
You can also make your fighter run so as to quickly close a gap between your fighter and the opponent. To do this, just use the left stick and then press it in the direction of your opponent. This will make your character move forward quickly towards the opponent. Additionally, when standing up, you can also use a clinch against an opponent by using the Left Trigger along with the right stick. To learn more about how this works, read about it in the following section.
CLINCH GUIDE
A clinch is basically grappling at close quarters and can be used to deal great amounts of damage. There are high risks involved in using a clinch since your opponent can turn the situation around by taking you down, performing a submission thereby leading you to take heavy damage. However, a clinch is really useful to deal high damage very quickly. You can use a clinch by pressing Left Trigger + Right Stick Up or Left Trigger + Right Stick Down.
Once you’ve used a clinch, you can also go straight to ground fighting by holding Left Trigger to bring up ‘take down’ options and then selecting one of these using Right Stick. If your opponent puts you in a clinch, you should focus on defending yourself and building up your stamina. You can also block attacks using the same buttons as when stand-up fighting.
MULTIPLAYER MODES GUIDE
There are a whole number of multiplayer modes available in this game that makes it a great game to play with friends as you hone your skills at fighting. The following are the different multiplayer modes in the game.
- Knockout Mode: In this mode, there is no grappling or ground game available. It is a mode where players have a health bar which decreases as players take damage. This is a fast-paced mode so make sure you unleash your best combos as quickly as you can. Once the opponent’s health is down to the last bar, all that’s left is to finish the fight because the next attack will knock the opponent out.
- Stand and Bang: This is a mode with its emphasis on strikes and no ground game available. A match in this mode lasts five rounds, so make sure you pick your best fighters! Fighters can be knocked down in a single shot in this mode.
- Submission Shootout: This mode is all about ground game as you will depend on holds, and perform submissions to try and attain victory.
- Fight Now Custom: In this mode, you can customize every single setting including adjusting stamina, damage, health recovery, and much more. You can use this to create a very specific kind of match that you and your friends have in mind.
- Tournament Mode: As the name suggests, this mode sees you participating in a tournament where you will try and defeat your opponents one by one. The last man left standing is the victor.
G.O.A.T CAREER MODE GUIDE
In this game’s career mode, you need to take care of both your skills in the fighting ring as well make promotional choices that help increase your fans. As you get better contracts you can get more cash and better access to training equipment which helps your fighter becomes stronger. You need to manage your fighter’s skills and also manage his many fans. Slowly and steadily then, you’ll see your fighter become the Greatest Of All Time.
The game’s career mode will properly kick off with the World Fighting Alliance. If you’re able to impress those scouting new talent, then you’ll soon be able to fight in the UFC. If you don’t, it’s not a big deal as you’ll have plenty of opportunities to prove yourself later on as well.
In the game’s career mode, you need to select which training camps your fighter will go to. Training camps are incredibly important as it also affects which stats of your fighter are improved. If you want to improve the weaker areas of your fighter, then go with a training camp that specializes in these areas that your fighter needs to improve upon. However, keep in mind that gym loyalty is rewarded, so think carefully before choosing to change the gym you go to.
ULTIMATE TEAM GUIDE
In Ultimate Team mode, you get to assemble your very own dream squad to own the Octagon.You will need to know more about sets to be able to do this. Sets are basically a thematic collection of Ultimate Team items that rewards you with new cards. As you trade more and more, your power over the Octagon also slowly increases. Make sure you build your fighter with Ultimate Team before you start playing the game online.
There are two different types of sets that are currently available including the Champions Sets and Crafting Sets. If you manage to get a Gold tier fighter item from all of the opponents your fighter has defeated, then you will be able to complete the Champions Sets. Completing this will reward you with an Elite tier fighter item, so it’s well worth the effort.
As for the crafting sets, completing a specific set will net you either a lot of tokens or some specific items such as Gold moves, Gold contracts, etc. You can complete the set by trading in items that are of the same tier. After you trade in these items, you’ll be rewarded with crafting tokens. Watch the video below for more information on how to build your Ultimate Team.
ACHIEVEMENTS/TROPHY GUIDE
- UFC 1: The Beginning: Complete the UFC 3 Introduction.
- UFC 80: Rapid Fire: Land a four-hit combination. (online multiplayer only)
- UFC 35: Throwdown: Finish the fight with a submission. (online multiplayer only)
- UFC 101: Declaration: Trigger a health event on the opponent within 10 seconds of your taunt. (online multiplayer only)
- UFC 46: Supernatural: Sway to avoid at least 6 strikes in 20 seconds. (online multiplayer only)
- UFC 99: The Comeback: Survive at least two health events before winning the fight. (online multiplayer only)
- UFC 56: Full Force: Win in the first round of an online multiplayer match.
- UFC 64: Unstoppable: Complete all your daily objectives in UFC Ultimate Team in one day.
- UFC 31: Locked and Loaded: Every slot on one of your UFC Ultimate Team fighters is filled.
- UFC 73: Stacked: Acquire your first Gold tier UFC Ultimate Team Item.
- UFC 87: Seek and Destroy; Complete all Challenges in a UFC Ultimate Team Solo Challenge Group.
- UFC 39: The Warriors Return: Complete all Sets in a single UFC Ultimate Team Program.
- UFC 68: The Uprising: Earn your yellow belt in UFC Ultimate Team. (level 50)
- UFC 45: Revolution: Earn your orange belt in UFC Ultimate Team. (level 100)
- UFC 109: Relentless: Earn your green belt in UFC Ultimate Team. (level 150)
- UFC 2: No Way Out: Win against a CPU controlled fighter who is set to maximum damage, with your own set to default.
- UFC 10: The Tournament: Win four fights with the same fighter in a 16-fighter tournament.
- UFC 65: Bad Intentions: Pass all Skill Challenges on any difficulty.
The following are the secret achievements.
- UFC 3: The American Dream: Sign a Rookie Contract during your Career.
- UFC 11: The Proving Ground: Sign a Prospect Contract during your Career.
- UFC 88: Breakthrough: Sign a Contender Contract during your Career.
- UFC 22: Only One Can Be Champion: Sign a Superstar Contract during your Career.
- UFC 13: The Ultimate Force: Sign a Legend Contract during your Career.
- UFC 44: Undisputed: Become the Greatest Of All Time during your Career.
- UFC 82: Pride of a Champion: Sign a Superstar Contract on Legendary difficulty during your Career.
- UFC 61: Bitter Rivals: Defeat a rival during your Career.
- UFC 12: Judgement Day: Win on the main card of a Pay-Per-View during your Career.
- UFC 78: Validation: Successfully defend your title during your Career.
- UFC 47: It’s On!: Respond to a social media message during your Career.
- UFC 34 High Voltage: Start trending on social media during your Career.
- UFC 54: Boiling Point: Get very high hype for any fight during your Career.
- UFC 74: Respect: Win a performance of the night bonus during your Career.


