Capcom’s Monster Hunter World: Iceborne is full of things to do and secrets to unearth. One of those is the Golden Macaque, a rare monkey that can appear near hot springs. Capturing it is necessary for getting the Golden Gleam Achievement/Trophy but how do you find one?
First, leave your Palico at the hub since it could scare the create away. Head to Hoarfrost Reach and hang around Area 2. There are some hot springs there but given the Golde Macaque’s spawn rate, it might not appear immediately. Keep reloading until it eventually spawns, sneak up carefully behind it and capture it with the net.
Monster Locations
The expansion is also packed with beasts to battle. Whether it’s large monsters, brutes, Elder Dragons or new subspecies, the expansion will test your limits when it comes to hunting. We’ve composed some tips on how to battle many of the new monsters along with their locations. Note that the five hidden monsters found in the Guiding Lands have been omitted. You can learn more about them here.
Beotodus
Beotodus is the first monster you’ll encounter in Hoarfrost Reach. It’s main element is Ice and it’s main weakness is Fire (with Thunder being second best). It can afflict Iceblight and the weak points are its head, tail and legs.
Since Beotodus likes to “swim” through the snow and emerge only to attack, take some Screamer Pods with you and deploy them when it’s close. This will stun Beotodus and allow you to get some hits in. At some point, a Banbaro will interfere and inflict damage on Beotodus, which is always useful.
Other than that, Beotodus’s attacks have very obvious tells. One of the trickier attacks will be when it rears back, seemingly to attack, before diving back into the snow and jumping out. This can be easily avoided but keep this in mind if you’re trying to get some Foresight Slashes off with the Longsword.
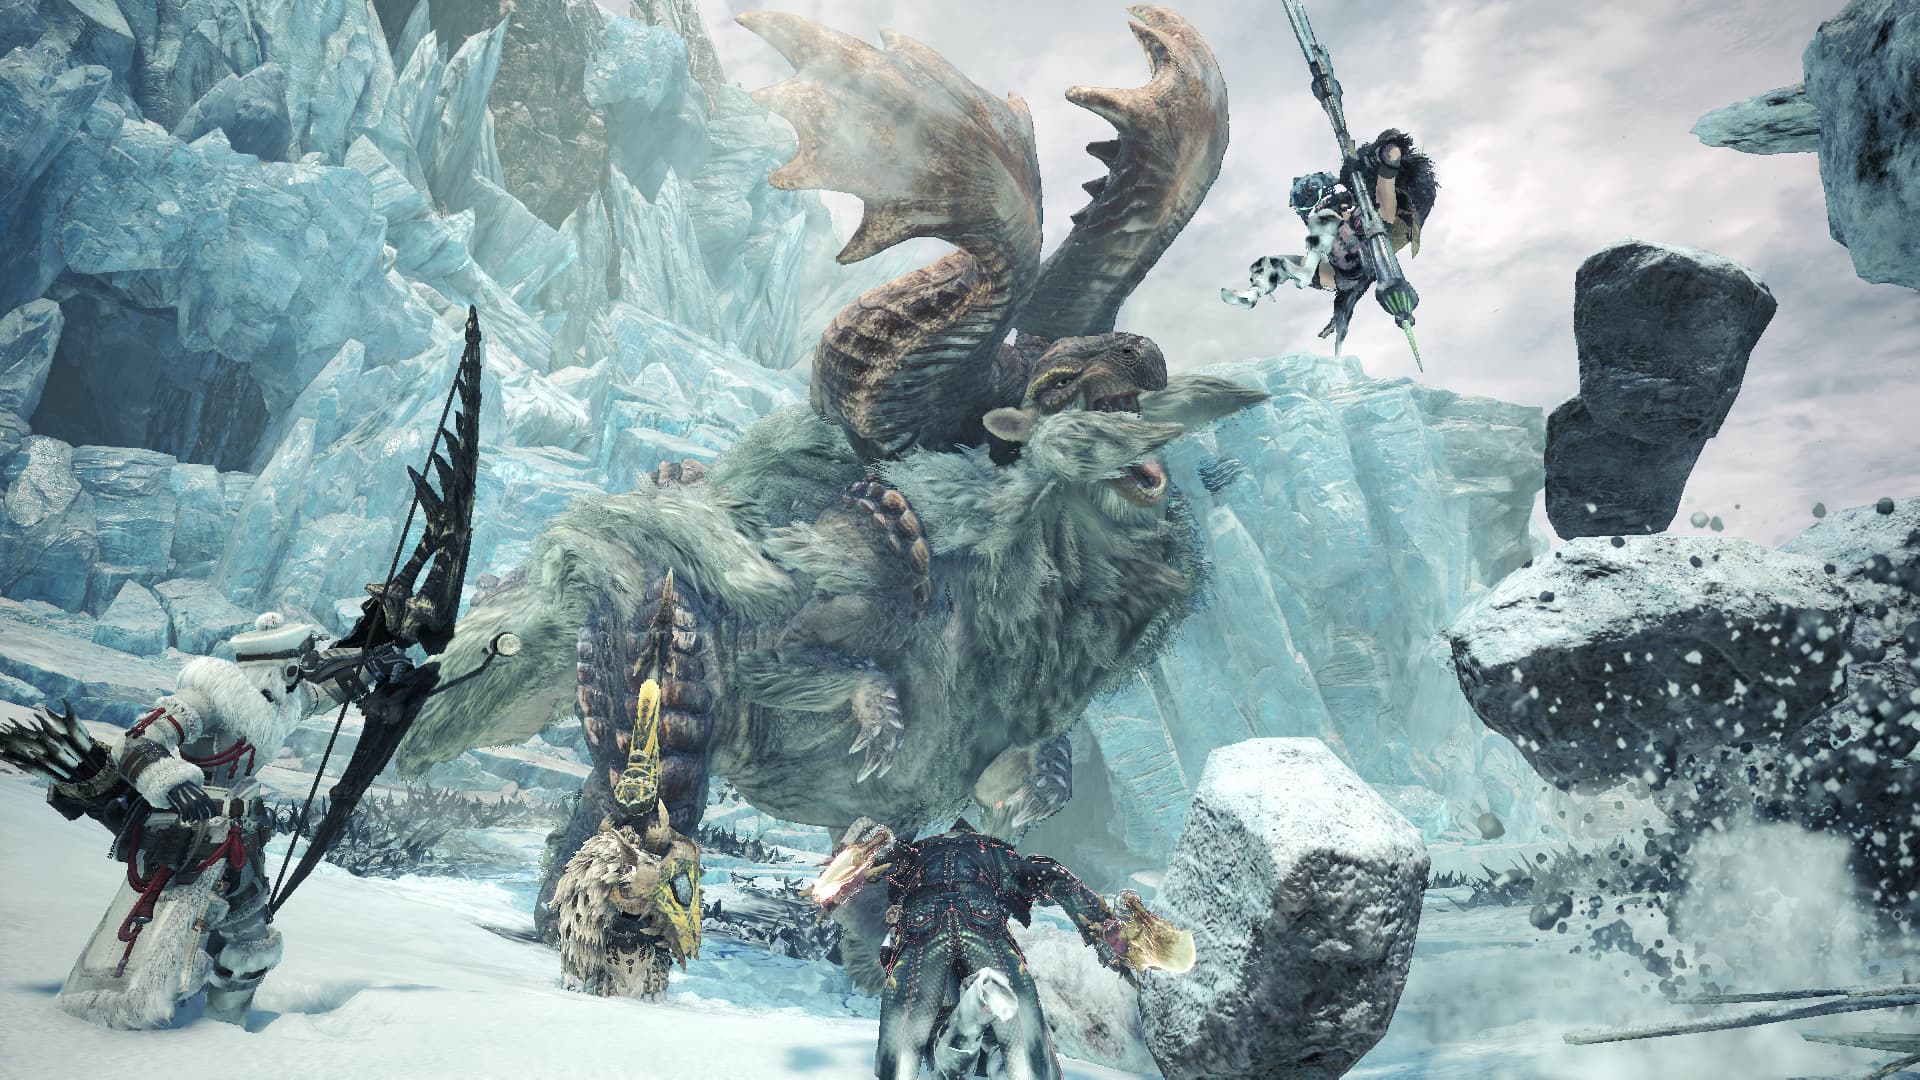
Banbaro
The first Brute Wyvern encountered in Hoarfrost Reach, Banbaro is weak to Fire. Its main element is Ice so watch out for Iceblight and target its head and legs. Along with constant charges, Banbaro also likes to pick up trees with its antlers and either swing them around or toss them into enemies. It also slams the ground with its head and antlers, which present a good opening to attack given the recovery time.
Banbaro can get into a turf war with Beotodus so once again, take the time to recover or plan your next attack while both monsters are duking it out.
Nargacuga
A Flying Wyvern, Nargacuga is capable of inflicting Bleed and Poison so keep Astera Jerky and Antidotes handy. It thankfully doesn’t have an associated attack element and is weak to Thunder first and Fire second. Aim for the head, tail and hind legs to exploit its weak points. Nargacuga is pretty fast and you might need to use traps to halt it in place (Paralysis and Sleep inducing weapons will also be useful). Another window of opportunity arises when it slams its tail down. It gets stuck in place, allowing you time for attacking.
Coral Pukei-Pukei
One of the first subspecies you’ll fight is Coral Pukei-Pukei. Its weak to Ice, followed by Thunder and its weak points are the head and tail. The biggest difference from its regular version is the Water attacks, which can result in Waterblight. Coral Pukei-Pukei is capable of firing water projectiles from its mouth but also fires a stream of water from its tail that sprays all over the place.
Water-resistant armor is recommended but keep some Nulberries handy otherwise. Use Flash Pods to bring Coral Pukei-Pukei down and keep to its side to avoid projectiles from its mouth. Otherwise, the same philosophy as the normal Pukei-Pukei applies: Cut off its tail and go for its head.
Nightshade Paolumu
The second subspecies you’ll encounter, Nightshade Paolumu can be fairly annoying to fight. That’s because it inflicts Sleep with clouds of gas that will knock you out. Its attacks and patterns otherwise resemble the normal Paolumu – using the Clutch Claw’s grapple to attack it in the air will be important. Go for its head, ears and chest as weak points. Water is its biggest elemental weakness followed by Fire, Thunder and Ice. Flash Pods and Traps to knock it down and keep it immobilized are also recommended.
Viper Tobi-Kadachi
Another subspecies, this time of Tobi-Kadachi. Despite having the same weak points – head and legs – and the same elemental weaknesses – Thunder is the best, followed by Ice, Fire and Dragon – Viper Tobi-Kadachi doesn’t mess around. It can inflict Poison, Paralysis and for the first time in the game, Deadly Poison which will chunk your health down in a hurry. Keep Antidotes and Herbal Medicine handy, especially the latter since it will heal Poison and recover health instantly.
On top of shooting spikes from its tail, Viper Tobi-Kadachi also has a habit of gliding and following this up with a rising, spinning attack. It’s not too hard to avoid but keep some distance when it starts gliding. Use Shock Traps to stop its movement and then go to town on its weak points.
Tigrex
A brutal monster to face, Tigrex is insanely aggressive with high mobility. Interestingly, the Blights it can affect will change depending on the terrain. So on snowy terrain, it can inflict Iceblight. In watery locations, even if there’s just a small stream of water, it can trigger Waterblight. It’s weak to Thunder first and Dragon element second. Its head, tail and forelegs are the weak spots.
Tigrex has a number of devastating attacks. It will barrel straight at you and then turn around to do the same attack again. It can slam the ground and send several boulders flying at you. It can also become enraged. There’s also a spinning attack, which has a decent tell, that can hit the player from any direction.
Use the Clutch Claw to send Tigrex into nearby environmental objects, thus knocking it down and opening it up for attacks. Given how much it barrels into its surroundings, this isn’t too difficult. Shock Traps are also good for stopping its movement. Keep some Earplugs for its roars to avoid getting stuck in place before it attacks. The roar can inflict some damage when you’re close so be careful of that as well.
Barioth
Barioth is a Flying Wyvern that’s a lot more hard-hitting than Nargacuga. Its weak points are the head, tail and legs and his elemental weaknesses include Fire, followed by Thunder. Of course, its main element is Ice and it can thus inflict Iceblight. Barioth is capable of gliding and making large bounding leaps to close the distance. Not only that but he can shoot ice projectiles that turn into cyclones. Don’t worry – the cyclones don’t have too much duration.
First of all, having Ice-resistant armor is important to avoid Iceblight. You might also want to use some Shock Traps to stop Barioth’s movement. Cutting off its tail should help in dealing with its huge reach but don’t let your guard down. If you want to play it safe or learn Barioth’s opening, the Gunlance comes highly recommended for this fight. Poke, fire, guard and repeat.
Glavenus
The sword-tailed beast is back and better than ever. Glavenus is weak to a number of elements, the most effective being Water then Ice and Dragon. Its weak points are the head, tail and belly (be careful when attacking the tail – some spots will cause your weapon to bounce off). Its main element is Fire but it can also inflict Bleeding.
Glavenus may seem like an overbearingly aggressive monster but it’s actually quite measured with its attacks. It’ll shoot fire (sometimes several times in a row) from its mouth and bite you but can also “sharpen” its tail to make it red hot. Watch for the animation when it catches its tail in its mouth – this will lead to a spinning attack with large range. Glavenus also has a habit of slamming down its tail in a vertical motion. This can be easily avoided but watch out for the follow-up double swipes and fiery explosions.
Be careful not to get backed into a corner when fighting Glavenus since it can easily wallop you. Try to find spots around its tail to avoid big damage. Traps for stopping its movement and weapons with high mobility are useful. The Insect Glaive is especially potent since it can deal heavy damage to Glavenus’s head and increase the potential of a stun or knockdown.
Shrieking Legiana
Don’t let this variant of Legiana fool you. The Shrieking Legiana is fairly brutal in its own right and can be doubly annoying when a regular Legiana shows up. The same weaknesses apply though. Go for the head, tail and legs with Fire being the best element, followed by Thunder. Shrieking Legiana inflicts Iceblight, much like its regular version.
Many of the attacks will be familiar as it swipes with its tail, careens headlong into you and executes a spinning attack while airborne, leaving icicles in its path. One particularly devastating attack is its flying tail swipe which creates icicles in a wave. Another attack sees it rise up in the air before coming down with a dive bomb that leaves icicles on impact.
Keep some Flash Pods handy. While you can’t spam them to keep Shrieking Legiana grounded, they’ll still stun it in mid-air when used at regular intervals. Ice-resistant armor is a given here, otherwise you’ll be dealing with tons of Iceblight. Ultimately, fighting off the other Legiana will be the toughest part but once it’s one-on-one, you should be fine. Use hard-hitting weapons like the Hammer on its head to stun it or “safer” options like the Sword and Shield for defense and mobility.
Fulgur Anjanath
Have you ever wanted to deal with the aggressiveness of Anjanath but mixed with some Thunder? That’s what Fulgur Anjanath is for. It inflicts Thunderblight, is weak to Ice and then Water, and its head and tail are the weak points. If you’ve fought regular Anjanath, then much of the same aggression (and tactics) will apply here.
Which is to say you should be careful of its barreling attacks and huge leaps since they’ll take off a good amount of health. Fulgur Anjanath also fires lightning projectiles and when enraged, all of its attacks become infused with Thunder that can inflict Thunderblight. When it slams down, an explosive effect is created so be careful. Try to stay away from its head when its enraged, look to sever its tail and knock it off balance when you get the chance.
Ebony Odogaron
Ebony Odogaron is like a nightmare version of the original and it can inflict both Dragonblight and Bleeding. It weak points are still the same so go for the head, forelegs and tail. Best elements to use against it are Water, then Fire, Thunder and Ice.
On the one hand, Ebony Odogaron uses similar attacks to the regular version so you can, say, counter them with Longsword. However, it’s new attacks are a doozy. It can leap in the air and fire projectiles that inflict Dragonblight so keep some Nulberries handy. Dragonblight can also be inflicted when it bites or slams down with certain attacks. Also watch out for its spinning attack which can come out of nowhere and hit in a 360 degree arc.
It’s most susceptible to Poison as an ailment so if you have a weapon that inflicts Poison, bring it along. You could aim to sever the tail but go for the head for maximum weak point damage.
Brachydios
The battle with Brachydios feels like something out of Punch-Out!! A Brute Wyvern species first encountered in the Elder’s Recess, Brachydios coats its mitts with slime. When it punches or headbutts the ground, the slime is deposited and detonates after some time. If the player is hit with the slime, they may suffer from Blastscourge damage.
If you get caught in the slime, the best way to avoid damage is by rolling around or using Deodarant. However, when Brachydios is enraged, its fists and horn will glow yellow. All of its punches and horn attacks will explode directly on contact so be careful.
Since Brachydios moves around so quickly, consider investing in Evade Extender. This will increase your dodging distance, allowing for easier repositioning. Weapons like the Sword and Shield along with Dual Blades will also be helpful since they allow for swift attacks. Make sure to have some Dash Juice handy or else your Stamina will be running dry. Break its horn and fists and go to town.
Brachydios is weakest to Ice, followed by Water, Thunder and Dragon.
Acidic Glavenus
A subspecies of Glavenus, the Acidic Glavenus is located primarily in the Rotten Vale. Fighting it in such enclosed spaces can be tough, especially given its reach and the environmental hazards. Unlike the base version, Acidic Glavenus is weakest to Fire followed by Dragon in its Normal state, Thunder, Water and Ice. When in its crystallized state, Dragon element is the least effective.
Acidic Glavenus possesses many of the same moves with a few exceptions. When its tail is infused, it inflicts Defense Down, which lowers your overall defense. Upon smashing the ground, acidic spots are left which also inflict Defense Down. The monster can sharpen its tail to deal more damage at the cost of its debuff.
Once again, use traps to halt its movement and avoid getting backed into a corner. The Insect Glaive, Sword and Shield and Longsword can be effective for countering Acidic Glavenus’s moves while staying mobile. Navigate around its blind spots and avoid the acid to take it down quickly. You can also equip the Iron Skin skill to negate the effects of Defense Down and play more aggressively.
Velkhana
You’ll first encounter this mythical Elder Dragon in the Elder’s Recess. After that, there’s a battle in Seliana with cannons and other equipment. Both of these instances may cause you to think the real battle will be easy. Unfortunately, that’s not the case.
Head to Hoarfrost Reach to fight Velkhana whose main element is, obviously, Ice. It’s weakest to Fire followed by Thunder and Dragon. Pack plenty of Ice resistance to avoid Iceblight. Velkhana’s speed is perhaps the biggest obstacle in this fight – it can quickly transition from the ground to the air. It can twirl quickly, before stabbing you with its tail. If that weren’t enough, it has Ice breath, can conjure ice chunks in mid-air that fall and damage you, and release a wave of ice blocks. Particularly annoying is when it leaps a good distance away and unleashes a blast of Ice breath.
When Velkhana twirls and flies upwards, that’s a sign that the ice block wave attack is coming. Facing the monster directly is a sign of upcoming tail stabs so dodge accordingly. Whenever it’s stunned, take advantage of the Clutch Claw and Slinger to steer it into walls for massive damage. The ice block wave can be dodged but you’ll need to look for specific gaps in the waves. Don’t panic, stay on the move and get your attacks in whenever possible. Sooner or later, Velkhana will fall.
Seething Bazelgeuse
After the fight with Velkhana, Seething Bazelgeuse will be your next target. It’s encountered in the Elder’s Recess but don’t fight it straight off. Return to camp and then take up the quest – this will ensure you aren’t wasting time fighting it in Expedition Mode where it can run off.
Its main weakness is Ice followed by Thunder, Water and Dragon. Much like regular Bazelgeuse, it will roar constantly to stun you, charge at you and deploy its scales to explode. However, when enraged, Seething Bazelgeuse will have a purple-ish glow. Its scales will explode with a larger, purple-coloured radius so be careful.
Though it doesn’t spend as much time airborne, Seething Bazelgeuse does have a dive bomb attack. It will disperse purple scales all around it and soar into the sky. Get as far away from that point as possible because it will then dive down and create a huge explosion (the purple scales will also detonate so keep that in mind). Attack it if possible since its enraged state will be over. Traps, Blast resistance and weapons that carry Sleep ailments are very useful in this fight.
Namielle
Another new Elder Dragon, Namielle is an interesting combination of Thunder and Water. A number of its attacks use Water but it can also inflict Thunderblight. Its located in the Coral Highlands and weakest to Fire, followed by Dragon and Ice.
Namielle’s water attacks will inhibit your movement and even drag you closer to the monster if you’re not careful. Its wings possess an impressive span, capable of knocking you back from a decent distance. The water left behind is even more dastardly when the monster uses its Thunder attacks. Watch for Namielle’s glowing – the longer it charges, the greater the radius of its Thunder attack. It may also charge up and release a Thunder attack when it’s planning to flee so be careful.
Work your way around its Water breath attacks and charges to inflict damage. As soon as sparks of Thunder can be seen on its body, be careful not to be in any puddles of water.
Zinogre
The Thunder Wolf is in Monster Hunter World: Iceborne and packs a punch. Encountered first in the Guiding Lands, Zinogre is weak to Ice, followed by Water. It can inflict Thunderblight and Paralysis so bringing the Thunderproof Mantle along is key.
The key to this fight is attacking Zinogre while it’s uncharged since its movement is relatively slower. It will slam its claws into the ground, which can be avoided by dodging in the direction of its tail. Once Zinogre charges up, Thunder will course through it as it howls, which can make you flinch. There are two main attacks to watch out for in its charged state – the first ends with it landing on its back, which leaves it vulnerable.
The second sees it rolling in the air and firing orbs of Thunder out. Keep some distance – they’ll fire in a spiral-like pattern, making them easy to avoid when you’re far enough away. Attack its head when it charges since this may interrupt it briefly. Stay alert, attack when it lands on its back and bring enough Thunder and Paralysis resistance to emerge victorious.
Savage Deviljho
Remember Deviljho and how it became enraged, turning into a nightmarish creature to battle? Savage Deviljho is basically that, except constantly enraged and encountered in all regions (it may even invade some hunts). Its breath attacks are much more frequent and indiscriminate, catching you with Dragonblight if you’re not careful. Savage Deviljho also inflicts Defense Down, which means the resulting hops, smashes and tail attacks will cause a lot more damage if you’re debuffed.
Its weak to Thunder and Dragon elements followed by Fire and Water. Bring traps to halt its movement along with skills like Iron Skin to negate Defense Down. If you have experience fighting regular Deviljho, then you know much of what to expect. Attack its chest, be careful of its stomp attacks and try not to spend too much time near its mouth. If you need to dip out and return to camp to get more traps, use a Farcaster.
Blackveil Vaal Hazak
Everyone’s favourite zombie Elder Dragon has a new subspecies and it’s fairly brutal. Blackveil Vaal Hazak can be found in the Ancient Forest and subsequently in the Rotten Vale. Its weak to Fire followed by Dragon, Ice and Thunder. Much like its predecessor, it causes Effluvial Buildup which can slice your maximum health in half. Effluvia Resistance is a must.
The fight is more or less the same. Blackveil Vaal Hazak will charge at you, wind its head back and spray effluvium in a straight blast and get up on its hind legs to spew effluvium at the ground in a large radius. Its newest attack are the spores on its body erupting and firing out in all directions. They’re relatively easy to avoid but try to not get cornered by the monster, lest it charge you mercilessly.
Yian Garuga
A Bird Wyvern with a killer beak, Yian Garuga is encountered in the Guiding Lands. Its main element is Fire but along with Fireblight, it can inflict Poison damage. Its weak to Water followed by Dragon and Ice while being resistant to Thunder.
Yian Garuga is very aggressive, to the point that it can destroy pitfall traps. Though it has a number of breakable parts, go for the tail and head with weapons like the Longsword, Sword and Shield and Dual Blades. Try to avoid its attacks until it gets tired and then lay into it. Blast damage is surprisingly effective followed by Paralysis so bring some of those weapons if you don’t have a great Water weapon.
Shara Ishvalda
The final boss of the story, Shara Ishvalda is the Old Everwyrm. It’s found on Origin Isle and after being defeated, will appear randomly like Xeno’jiiva for the duration of two quests. Shara Ishvalda is weak to Ice followed by Water, Dragon and Fire. Blast ailment is also effective against it.
The first phase involves fighting its large rocky form. It’s not too fast but it can unleash a number of tremors and charge with its wingtips for massive damage. Attack the head and chest constantly while also using the Clutch Claw to knock it into obstacles. The Longsword is handy here but the Greatsword is recommended for the sheer damage and stun potential. Once its rock form has dissipated, you can move onto the next phase.
The next phase sees Shara Ishvalda showing its ugly mug. Its wings are like full-fledged claws that it can use to attack. It fires lasers when its wing-claws are joined together and can generate an enormous, Spirit Bomb-like projectile to fire at you from the air. Be careful when it digs into the ground with its wing-claws since it will start generating tremors. Shara Ishvalda is also capable of sinking into the sands and relocating, so look around when you see this happening.
Keep away from its front, attacking its chest and front limbs whenever possible. The wings are also breakable but focus on the head when Shara Ishvalda is knocked down. A note on the sand in the arena – after a point, it becomes possible to fall into it and re-emerge, taking massive damage. These sand-traps are easy to spot so exercise caution.