


The Legend of Zelda: Breath of the Wild may have seen the Calamity end, but Hyrule is far from peaceful. Once the Upheaval begins and Ganondorf appears to cause havoc in Tears of the Kingdom, Link must again answer the call and defeat him.
The task is anything but easy, considering the sheer number of threats throughout Hyrule’s lands. Along with regular enemies, you’ll confront some monstrous bosses, some old and the majority new, en route to defeating Ganondorf once and for all.
Let’s look at all the major bosses in The Legend of Zelda: Tears of the Kingdom and how to beat them.
How to Defeat Talus and Battle Talus
Talus, the massive rock-like bosses from the first game, return. Bombflower arrows, blunt weapons and non-sharp damage will still do a number on them. But what happens if you run into a Battle Talus, like in Romani Plains?
These are essentially Bokoblin forts but created on top of a Talus. So when you assail them, you may be taken aback when the Talus slowly rises. Use arrows to take down the Bokoblins while evading their ranged attacks.
Look for a ladder nearby (which usually leads to a chest that remains locked until all enemies die), climb it and hop on the Battle Talus’s platform. Strike the ore node on top with a blunt weapon to kill it quickly. You could also pelt the weak spot with Bombflower arrows until it dies. Either approach works.
How to Defeat Hinox and Black Hinox
The Hinox is a monster in the overworld, defined by its singular eye. It can deal massive damage with each strike, but as you’ve probably guessed, its eye is its weakness. Shoot the eye with arrows while continuously backing up to blind it. It will become stunned and sit for some time. Smack away with a strong weapon when that happens, and back off when it gets up. Repeat the process.
There are variants of the Hinox, like the Black Hinox, which has greaves protecting its legs. The process is the same, however. Shoot the eye with an arrow (or which greave is metal with electricity) and strike their body when they’re stunned.
Be careful, as some Black Hinox have been infected by the Gloom. These monsters will cause permanent damage to your Heart Containers, reducing overall health. Keep some Gloom-healing food handy to circumvent this, or keep your distance.
How to Defeat Stalnox
This enemy is an undead version of Hinox, found in locations like Skull Lake Cave. Shoot the eye to blind it and cause it to fall. However, once you fully deplete its health, the Stalnox’s eye will detach and bounce far away on impact. Keep after it and attack, but beware since the Stalnox can still attack. Once the eye is dead, the Stalnox will fall.
How to Defeat Colgera, Scourge of the Wind Temple
Located in the Wind Temple, Colgera is that massive centipede-like creature seen in trailers. Tulin, the Wind Sage, is with you for this battle, and you’ll need to rely on the Glider to gain some height.
You’ll both start by diving through the air – wait for Colgera to stop and launch some frozen projectiles at you. Avoid them and shoot Fire Fruit-infused arrows at the exposed weak spot to damage it. Alternatively, skydive right through its weak spot for massive damage. When hurt, Colgera will move through a large sphere and seemingly disappear. It can suddenly teleport and emerge from below you, so be careful.
As it passes, use more Fire Fruit-infused arrows to hit its weak spot again. Make sure you look up after taking out a weak spot – there should be a second just above it, letting you get more damage in. If you can’t hit it, don’t worry. Wait for Colgera to stop again, fire its projectiles, and expose its weak spot. Then pelt it with Fire Fruit arrows. Note that you can still break its weak spots and deal damage with regular arrows – it’ll just take a few more shots.
When Colgera drops to 50 percent health, it will become enraged and fire tornados at Link. Avoid them with Tulin’s help, utilizing his ability to gain a speed boost and glide away quickly (ensure you’re facing the right direction and don’t rush right into a tornado). Once Colgera begins firing its projectiles, rinse and repeat against its weak spots to finally destroy it.
How to Defeat Master Kohga
The Yiga Clan master returns and has the power of vehicles on his side. You’ll first encounter Master Kohga in the Great Abandoned Central Mine via the Central Hyrule Depths when discovering Autobuild for the first time. He’s none too happy that Link has claimed the ability and challenges you.
You’ll be trapped in an arena as Kohga drives around in a vehicle, trying to run you over. It moves slow enough to start with, so step aside and attack with arrows to knock him off. Don’t bother commandeering the vehicle for yourself – Kohga will make it disappear and hop back on elsewhere. Instead, run over and deal as much damage as possible while he’s knocked down. Repeat this process when he re-summons the vehicle.
At half health, Kohga will place a wooden board above his driver’s seat, so you’ll need to be more precise with your shots. Follow the same process. When his health falls more, he’ll create a small barrier that acts as a window, preventing you from shooting him. The vehicle will then suddenly speed up to run over Link.
It can be devastating if you don’t have enough Heart Containers or defense. Stick to the outer edges of the arena and run as quickly as possible to avoid damage.
When Kohga rams the outer walls of the arena, he’ll be stunned. Go around the back of the vehicle, run up the ramp and beat him down. You could also use a Zonai Rocket, fly up to avoid his ramming attack, and then fire on him while descending to deal damage.
How to Defeat Phantom Ganon (1st Battle)
Phantom Ganon is found inside the Great Deku Tree when you’re looking to retrieve the Master Sword. You’re first met by multiple hands arising from a pool of Gloom. While it may seem wise to shoot each one in the eye individually, there’s an easier way – Bombflowers. Throw Bombflowers in the center of all the hands to take them out.
Eventually, Phantom Ganon appears, and attacks with a sword. A pool of Gloom slowly starts to expand around it, so keep attacking to make it shrink. Shooting its head briefly stuns it, so focus on dodging its sword strikes and getting Flurry Rush combos with your hardest-hitting weapons.
The Gloom will decay your Heart Containers, so keep up the attack on Phantom Ganon and keep some Gloom-healing meals if things become too dire. Phantom Ganon’s sword strikes are straightforward but beware of his spinning slash. That has a slight delay, as he charges up.
How to Defeat Master Kohga (2nd Battle)
You’ll run into Kohga again later, futilely attempting to access a Zonai terminal with his right hand. He’ll battle Link again, flying around on a Zonai Glider, which sprays fire as he passes. Shoot him off, but if his movement is an issue, fuse Keese Eyeballs to arrows for tracking arrows. Once Kohga falls, beat him up.
There are also flying Zonai vehicles in the area that you can use to catch up to Kohga. If you have Yunobo with you, fire him like a projectile. It’s another effective way to take Kohga down.
How to Defeat Master Kohga (3rd Battle)
This time, Master Kohga will be on a boat in a nearby lake in the Depths, piloting it while his henchmen fire arrows. Use Ultrahand and drop a nearby boat of your own and give chase. Get close to jump onto Kohga’s vessel and then beat the stuffing out of all three enemies. Once he disappears, commandeer his ship and give chase again.
If you jump off the steering wheel, you can shoot arrows mid-air. If it’s too much work, just ram Kohga’s boat, stop and shoot him from your own until he’s stunned. Then jump on board to beat him down. At half health, Kohga constructs a barrier around himself on his boat. Once you get close enough, he’ll conjure a boulder to throw at you.
Activate Recall and send it right back. Jump back to his boat and continue the assault, again using Recall if he throws another boulder.
How to Defeat Yunobo
Yunobo is not himself, as the text above his health bar indicates. Nevertheless, you must fight him. He’ll roll up into a ball and charge Link, but you avoid this by simply strafing left or right. Once stunned, attack and damage his mask. Repeat this two more times until he comes to his senses.
How to Defeat Moragia
After you save Yunobo and follow “Zelda,” you’ll come across Moragia, or at least three heads representing it. Use Ultrahand and commandeer the Zonai Glider on the right (or look to the left for two more). Yunobo will attach himself to the front as a projectile. Fly close to each of Moragia’s heads and send Yunobo out to cannonball them back to the stone age. Be careful of their flames since they can knock the Glider off-balance.
How to Defeat Marbled Gohma
You’ve fought Gohma before, but this one is a step up in durability. Yunobo will accompany you to fight. First, instruct Yunobo to charge at one of its legs, which are made of rocks, to shatter it. It will execute a ground slam, so stay a decent distance away and destroy another leg.
Marbled Gohma will fall to the ground, leaving its eye within reach. Climb up a bit and attack it. It will slowly rise, so ensure you jump off early, lest it damages you. Repeat the same process as it regenerates its legs. After going down to half health, Marbled Gohma will jump up to the ceiling. Send Yunobo at one of its legs closest to the wall to break it and cause the boss to drop, exposing its weak point.
Marbled Gohma will drop several boulders around Link and detonate them while keeping its main body exposed. Use Yunobo to break the boulders or Recall to remove them from your path. If it starts throwing boulders in an arc from the ceiling, use Recall to send them right back.
How to Defeat Master Kohga and Zonai Construct
The final battle with Master Kohga sees him on top of a Zonai Construct. He’s exposed initially, so shoot his head to knock him off. Run up and attack until he jumps back on. Repeat this process, taking care not to shoot his barrier.
At less than half health, he’ll conjure a barrier around himself and fire two lasers from the Construct’s arms. Run through the space between them and wait until he summons three spiked balls. Use Recall on the middle one and send it back to break his barrier and knock Kohga off. Deal damage and repeat this process to send the Yiga Clan leader packing once and for all.
How to Defeat Sludge Like
Encountered in the Zora’s Domain, the Sludge Like is a nasty LikeLike-looking monster covered in sludge. This essentially serves as a tutorial for Sidon’s ability, which encases Link in a bubble of water that can negate one hit. You can also execute a water slash when protected to remove the sludge (though it also dispels the barrier).
However, there are other ways to clean the sludge. Use Splash Fruit to remove the sludge encasing the monster. If you have a Zonai Hydrant Capsule, take it out, hit the Hydrant and then carry it around like F.L.U.D.D. from Super Mario Sunshine, cleaning up the surrounding sludge as you go.
Otherwise, you know the drill when it comes to LikeLikes. Target the weak spot in its mouth with an arrow, and once stunned, switch to a heavy weapon and go to town.
How to Defeat Mucktorok, Scourge of the Water Temple
The Mucktorok is the Scourge of the Water Temple, but Sidon is present to help you. It may look weak, but it will summon a shark made of sludge to swim around in. Use Sidon’s water bubble to bring out a water attack and stun it (or throw a Splash Fruit or fuse it to an arrow). The sludge shark will evaporate, leaving the Mucktorok vulnerable. It will leap away after taking enough damage and enter sludge shark form again.
Be careful when it leaps up and creates a big splash – this will emanate outwards in rippling waves. Sidon’s water bubble will keep you safe during this, so use it. It will also fire a sludge laser across the arena. Use the lesser gravity to leap over it, throw a Splash Fruit to interrupt it, and then use the water attack from Sidon’s ability as it moves around to stun and expose the Mucktorok.
After half its health is gone, the Mucktorok will splatter sludge everywhere. It will re-enter the sludge shark and fire projectiles while splashing and sending out sludge waves. Once again, use Sidon’s water bubble to avoid damage and float while gliding to surmount all the sludge spots. Throw a Splash Fruit at the shark twice to stun it and again attack the Mucktorok. Be careful because it will fly around, shooting out sludge projectiles, so shoot it out of mid-air to stop it.
If the sludge puddles become too much, use a Zonai Hydrant to clear them all. It also prevents the Mucktorok from jumping around when it’s vulnerable, making it easier to shoot.
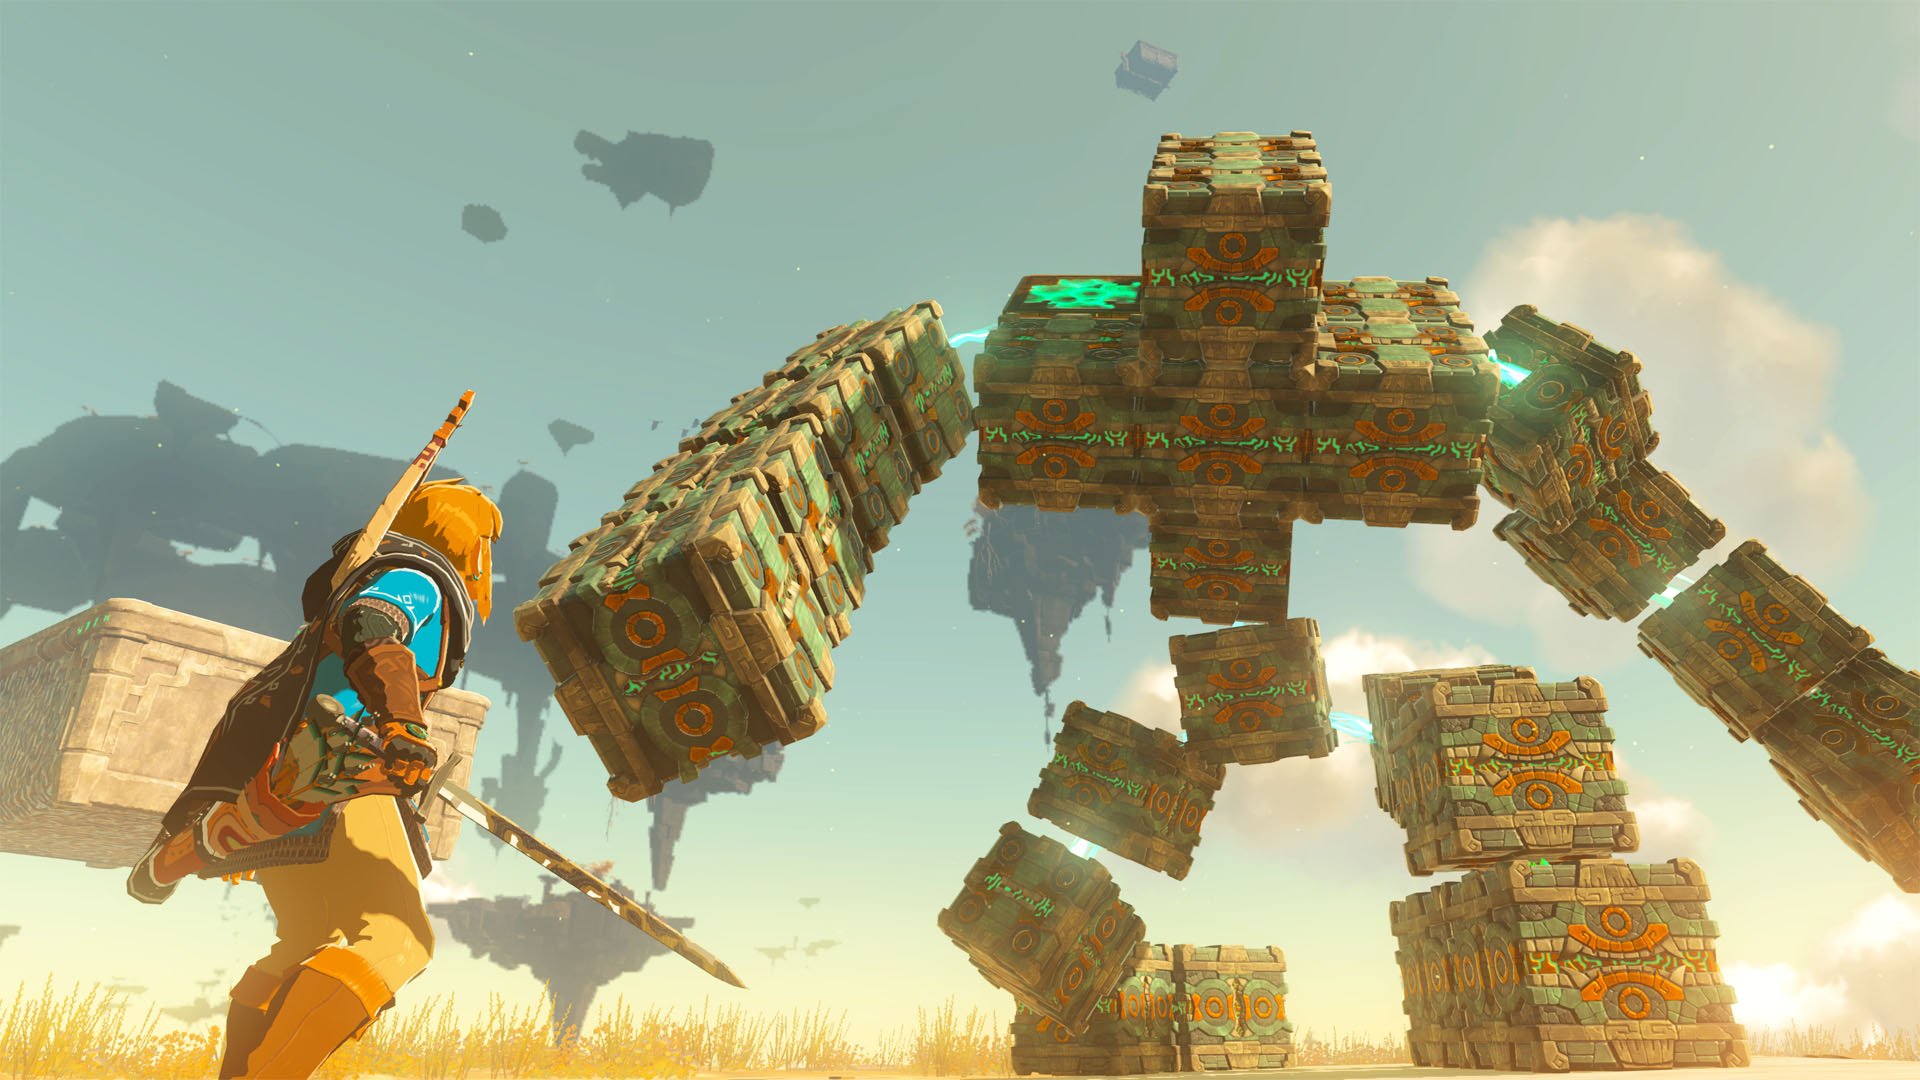
How to Defeat Flux Construct 1
The first Flux Construct you’ll fight is probably on the Great Sky Island and is a good test for your new abilities. It’s comprised of numerous Zonai blocks, with one being the weak spot. You want to pull out this block using Ultrahand, causing the entire structure to crumble and beat it to death. Sounds simple enough, but the Flux Construct will change forms after each damage phase.
When it’s a walking giant, use Ultrahand to pull away any other blocks in front of the weak spot. You can then shoot it with an arrow to stun the Construct and pull the weak spot out to attack it (or keep shooting it with arrows, though that does less damage).
When it turns into a floating platform, dodge the blocks it throws and then pull the weak spot out. You’ll have more than enough time to make this happen. Finally, when it turns into a cube, avoid it, pull out the weak spot, or remove some other blocks to make it easier.
If you have any unfused weapons, use the other blocks as material to strengthen them and lay on the damage. These will persist after the fight, granting some decent blunt weapons for afterwards.
How to Defeat Flux Construct 2
Flux Construct 2 is similar to Flux Construct 1, save for some additional moves. Its platform form will now hover even higher up, and while the floating platforms nearby seem good for Ascend or getting closer, the solution is a lot easier.
Once it throws blocks at you, prep Recall. Just before they hit, use Recall on one block and climb on it. It will take you up to the boss’s weak spot – hit it for massive damage and cause its shape to crumble.
Other than that, its cube form will perform ground slams, so be careful not to remain too close. Keep moving and pulling blocks before yanking out the weak spot and damaging it.
How to Defeat Flux Construct 3
Flux Construct 3 is pretty much like the second one. It does have a new form, which is like a walking chicken of sorts that will peck the ground continuously. Keep your distance from that, and you should be safe.
The real threat is dealing with this monstrosity in the Depths. There are pools of Gloom in the arena, so you’ll need to move around carefully to avoid any damage to your Heart Containers. Given how hard the Flux Constructs can hit, you can end up in serious trouble if your max health is depleted. Keep some food to repair damaged Heart Containers, and you should be good.
How to Survive the Floating Colosseum
The Floating Colosseum is found in the Central Hyrule Depths and is home to several Lynels. Those who have fought Lynels in Breath of the Wild, you’ll know what to expect. Dodge or block their strikes as they rush at you.
The first Lynel uses a sword and shield – stay behind it and use Link’s charged spinning slash with a heavy weapon. The second has a two-handed sword and a massive spinning slash, so avoid that when behind it. Instead, strike it a few times and when it starts the attack, dodge and Flurry Rush for massive damage.
The third Lynel uses a halberd and bow – it will jump in the sky and slam down, so keep your distance. Dodge its initial charge and use a Flurry Rush for max damage. Just be careful whenever it sheathes its weapon – it will charge with its horns and can cause significant damage. You can dodge this, or parry, then follow up with arrow shots to stun it. Also, beware when it roars since it will stab the ground and create a huge explosion. It also charges up a fire projectile, so stick close to avoid it.
The fourth Lynel carries a sword and shield with a bow. Beware its grab and charging slice, and sidestep to deliver a Flurry Rush. Be careful when it rears back since it will attack with its horns. Keep moving around to strike its sides when close, and it should eventually fall.
The fifth and final Lynel is a doozy, wielding a massive two-handed sword with a spiked ball and rock armor that must be broken with a blunt weapon or Bombflower arrows. It has all the same moves as the others – a massive spinning slash, a charge, projectiles and can smash its weapon down. Once again, keep attacking and avoiding its big moves.
All the Lynels here are Gloom-afflicted and can damage your Heart Containers, so keep plenty of meals that can heal Gloom. Bring your best weapons, meals with damage buffs, the Master Sword and a fairy as insurance – this is a long fight.
How to Defeat Queen Gibdo, Scourge of the Lightning Temple
The Lightning Temple boss is a doozy, and like the other encounters, you’ll have help. Use Riju’s skill, which generates a lighting field, and wait for the boss to be inside it. Fire an arrow to trigger a lightning strike for massive damage. Queen Gibdo will turn white and start throwing sand tornadoes. Avoid them and strike her from the back or trigger another lightning strike to stun her. Be careful of her front attack since it deals massive damage.
Repeat this process a few times, and it will retreat to the roof. Once you get there, use Riju’s skill and trigger a lightning strike with an arrow. Queen Gibdo will turn white and start firing sand tornadoes again. Avoid her front and attack from the back.
Deal enough damage to her back (or use another lightning strike), and Queen Gibdo should fall to the ground, ripe for a pummelling. Once it loses half its health, it summons other Gibdos. Use Riju’s ability to destroy the pillars and cause light to flood the chamber, immediately reducing the other Gibdos to bones.
Do this enough times, while avoiding Queen Gibdo’s spray and use a lightning strike to ground it. Avoid the tornadoes as before, trigger another lightning strike to stun her, damage her on the ground, and repeat until she’s dead. If any other Gibdos attack, move towards the light shafts or have Yunobo steamroll them.
How to Defeat Phantom Ganon (2nd Battle)
Your second fight with Phantom Ganon takes place in Hyrule Castle. This time, it will summon four other clones of itself to assist. They all have the same basic attacks but can teleport to you if you’re far enough. Use a Flurry Rush by avoiding their attacks, but more importantly, keep running around and damaging them since this contributes to lowering Phantom Ganon’s overall HP. If you let the other Sages kite them, you can easily run around and strike from behind, or at least keep the pressure off while dealing with one at a time.
When it loses half of its HP, Phantom Ganon will summon a puddle of Gloom and its four clones again. This time, run up the stairs from the side and jump down while aiming a bow. Fire at its head repeatedly to contract the Gloom and go in for some damage.
Beware, as all the clones now have two-handed clubs and spears and will repeatedly jump attack. As before, try to single them out with the help of the Sages, taking them down one by one. Of course, you could also go up the stairs again and jump down, nailing each enemy in the head with bow shots.
Repeat the process from before when Phantom Ganon creates its Gloom puddles, and you should win the fight.
How to Defeat Seized Construct, Scourge of the Spirit Temple
The Scourge of the Spirit Temple is a Construct under the Demon King’s influence. Fortunately, you don’t just have Mineru, the Sage of Spirit, to help, but you pilot her like a mech. Mineru has several parts, attacking with projectiles and lasers. You can also attach different objects to her arm, though be careful when taking hits, since it’s still Link suffering the damage.
As strong as Mineru is, the Seized Construct is very tanky. Go to the corners of the room and attach a Spiked Iron Ball to Mineru’s left hand. Fire an explosive shot with the right to stun the boss, and attack with the Spiked Iron Ball hand to knock it back into the electrified barbed wire surrounding the arena. If it’s close enough to the barbed wire, you can use the right hand alone to knock it back.
Once it’s down to half health, the Seized Construct will sprout more arms, which means it can attach more devices. It even hovers in the air to attack. Keep up the same pattern, since the right hand’s explosive shot will bring it back down to the ground. If you need speed, attach a Zonai Fan to Mineru’s back part to surge forward. Knock the Seized Construct into the barbed wire enough times, and it eventually falls.
How to Defeat Frox, Blue-White Frox and Obsidian Frox
You’ll encounter some toad-like creatures called Frox while exploring the Depths, and despite how imposing they can be, they’re pretty easy to beat. You must throw a bomb into its mouth as it draws breath and sucks Link in. Of course, you can also shoot its eye to stun it, but your target is the ore nodes on its back. Break those with a blunt weapon to deal damage to the Frox.
Instead of hopping off its back when it recovers, stay on since it’ll propel you off, allowing you to glide and fire at its eye again and continue attacking its weak spots. There’s not much difference between the Frox, Blue-White Frox and Obsidian Frox in terms of strategy, so keep up the attack and avoid stepping in the Gloom.
How to Defeat Molduga
Located in the Gerudo Desert, Molduga is a giant sandfish thing which spends a lot of time under, only emerging to strike. The solution to defeating it is pretty straightforward – wait till it emerges, avoid its attack, and fire a Bombflower arrow to stun it. Then close in and hit its body (though be careful since it can use a spin attack while stationary).
How to Defeat Flame Gleeok
The Gleeoks are some of the most devastating bosses in the open world. Depending on the element, you’ll suffer from overwhelming weather, like the Flame Gleeok, which causes unbearable heat. You’ll want to find a spot to jump off of and fire arrows at its three heads to stun it. Once it’s down, you can attack.
However, once the Flame Gleeok is in the air (its wind pressure can throw you off-balance), it will unleash flame projectiles and lasers. After it drops to about 20 percent health, it flies high up into the sky, out of your reach and drops enormous meteors, one after another. These deal massive damage, so get out away as soon as possible.
Once the meteor has cleared, rush over to its still-burning flames and use the updraft to reach the Flame Gleeok. Shoot its heads again, and it will fall far and die. Alternatively, you can attach a Zonai Rocket to your shield and use that to fly up, which is especially useful for later Gleeok fights.
How to Defeat Thunder Gleeok
A Thunder Gleeok is hiding in the Coliseum Ruins in Hyrule Field. You know the drill – approach from the air and rain arrows down on its three heads to stun it. Get some shock resistance to avoid major damage from its lasers and projectiles. Since it’s tougher to find something to climb on and jump off, fuse a Zonai Rocket to your shield and fly up, then aim for its three heads to bring it down when it flies up.
Once it’s low on health, the Thunder Gleeok will summon a thunderstorm, so promptly unequip any metal items on your person. It will also strike the ground with thunder to create updrafts. One of them won’t be enough, so float over to another, avoiding follow-up thunderbolts to reach the Gleeok, shoot its heads and bring it down.
How to Defeat Frost Gleeok
Located in South Tabantha Snowfield, you know the drill with the Frost Gleeok. It’s worth noting that its lasers can generate large snowballs that roll all over, so be careful of those.
Once it’s down to its last dregs of health, the Frost Gleeok will fly up and start creating a massive whirlpool in the sky. This will drop frozen stalactites, which you can rewind using Recall. Follow their path back up, jump off with the glider, shoot it in the heads and bring it down to defeat it.
How to Defeat King Gleeok
You’re finally face to face with the toughest Gleeok of all – the King Gleeok. Located in Hebra Sky, it has three different heads, each with different elements, so you’ll need to watch out for thunder, frost and fire damage. The same method still applies: Shoot the heads to stun it. There are, thankfully, some pillars that can be used as cover and for jumping off.
Once again, when it’s low on health, it will fly off and unleash a powerful attack. The main difference is that it can use thunder and frost at the same time, bombarding you with lightning strikes and frozen stalactites at the same time. The same methods apply, but use the Glider to ride the updrafts from the lightning, since you get more mobility. Shoot its three heads to beat it once and for all.
How to Defeat The Demon King’s Army
This is one giant battle in the Depths against several Gloom-afflicted waves of Bokoblins, Lizalfos and Gibdos. The Sages will join you, but you can use Zonai Devices and just about anything else to cull the hordes. Vehicles with Flame Emitters or that one drone-like device which unleashes lasers from the sky are recommended. Just make sure you have the Zonai Capsules and Autobuild to bring them to life. After defeating all enemies, the path will clear, and you can face the final boss – Ganondorf.
How to Defeat Demon King Ganondorf, the Menace Unleashed
This is it – a one-on-one fight against the Demon King, Ganondorf. In a rather interesting twist, he’ll start with a sword, fighting Link as equals. His moves are similar to Phantom Ganon, but he can also dodge your blows at the last second and activate Flurry Rush. Raise your shield when he lands to safely block the oncoming blow or dodge to use your own Flurry Rush. His attacks will damage your Heart Containers like Gloom, so be careful.
Eventually, Ganondorf will switch to a two-handed club. Dodge his strikes (including the overhead slam) but be careful when he jams the club into the ground. It will unleash a shockwave that can knock you down. Jump at the last second and use your Glider to ride the resulting updraft. He’ll also unleash waves of forking energy at you. Move between them and the resulting overhead swing for a Flurry Rush.
How to Defeat Demon King Ganondorf, Master of the Secret Stone
You didn’t think it would be that easy, of course. Ganondorf harnesses the power of his Secret Stone, recovering (and extending) his health and taking on a more monstrous appearance. He’ll create clones like Phantom Ganon, but the Sages will appear just in time to help.
Many of Phantom Ganon’s same attacks and weapon types, so let the Sages deal with the clones, then focus on whittling them down. Be careful when he rushes with the spear – the trails he leaves create Gloom, which can damage your Heart Containers. Avoid the same two-handed club attacks as before, especially when he smashes down.
Upon losing half his health (which is more like a separate health bar unto its own), Ganondorf will power up again and face Link alone. He’ll once again dodge your attacks and activate Flurry Rush, so dodge his follow-up to retaliate. However, he can also summon a bow, and draw in some Gloom projectiles to surround Link before firing off Gloom arrows. Rush him but keep the shield up to avoid taking damage.
He’ll use his spear again, but send out three tracking Gloom projectiles before dashing forward. Avoid the projectiles first (move to the left if they’re approaching from your left, and vice versa if they’re coming from your right), and avoid the Gloom trail from his rush.
When he summons the two-handed club and smashes down, two waves of Gloom projectiles will emit outward. Back up and weave between their spaces to avoid them. Sidestep his follow-up blow for a Flurry Rush, but beware since he’ll dodge that into his Flurry Rush (which will happen more frequently as his health goes down). Keep up the pressure, and don’t bother with arrows since he’ll deflect them with ease.
How to Defeat Demon Dragon
After the second fight, Ganondorf will swallow his Secret Stone and become a Demon Dragon. Just when things look dire, the Light Dragon shows up to save Link. From this point, you can control the Light Dragon’s direction. However, you must outmaneuver the Demon Dragon and jump off. If you have the Gliding set, now is the time to use it for added skydive mobility.
Avoid the Demon Dragon’s projectiles and land on its body, preferably near the big glowing weak spots. Attack and destroy them. You’ll get thrown off, but the Light Dragon will appear to catch you if you fall far enough. Repeat this process three more times, and the surrounding skies will turn red.
Fly up high enough, and you’ll see the Secret Stone on the Demon Dragon’s head glowing. Jump off the Light Dragon and dive down, avoiding the projectiles and landing on its head. Attack the stone until it’s destroyed. Congratulations – you’ve beaten the game!
The Legend of Zelda: Tears of the Kingdom is available on Nintendo Switch. Check out our official review and more tips and tricks here.


